Installation and update
About supported operating systems
We currently support and recommend the following devices:• Android with the operating version 6.0 or higher;
• iPhone with the operating system iOS 12.0 or higher;
• Huawei with the operating system Harmony OS 2.0 or higher;
How to install the app
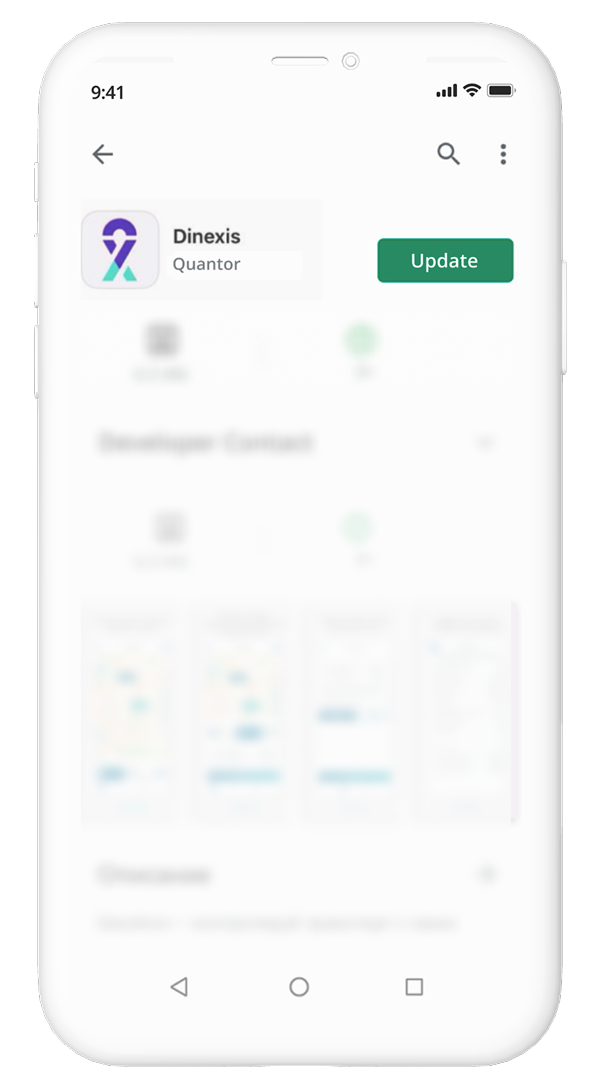
How to install the app to Android
Go to Google Play Market and search for Dinexis. Click INSTALL:
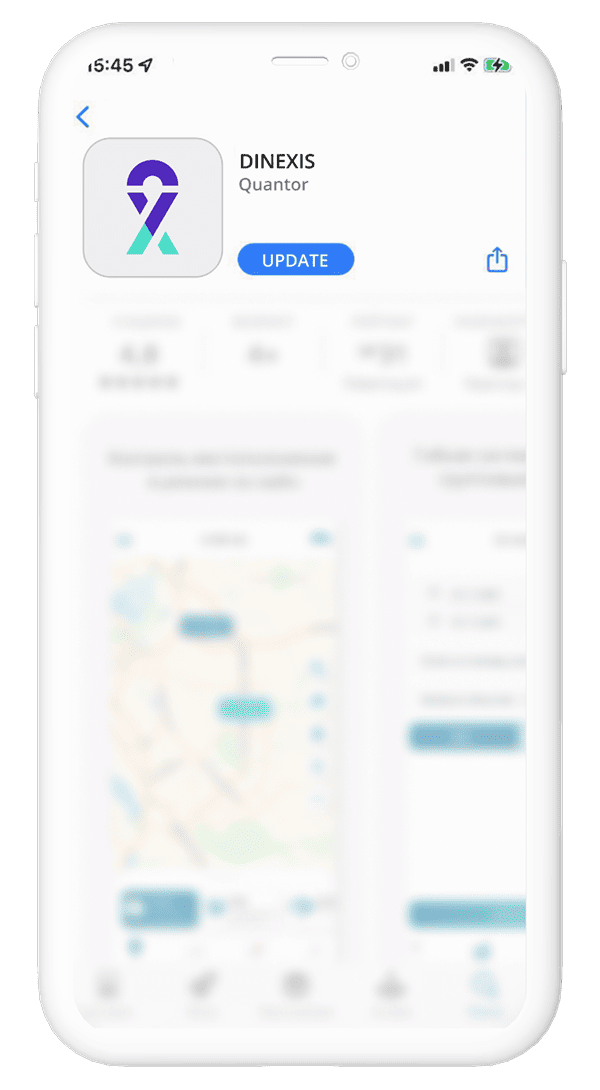
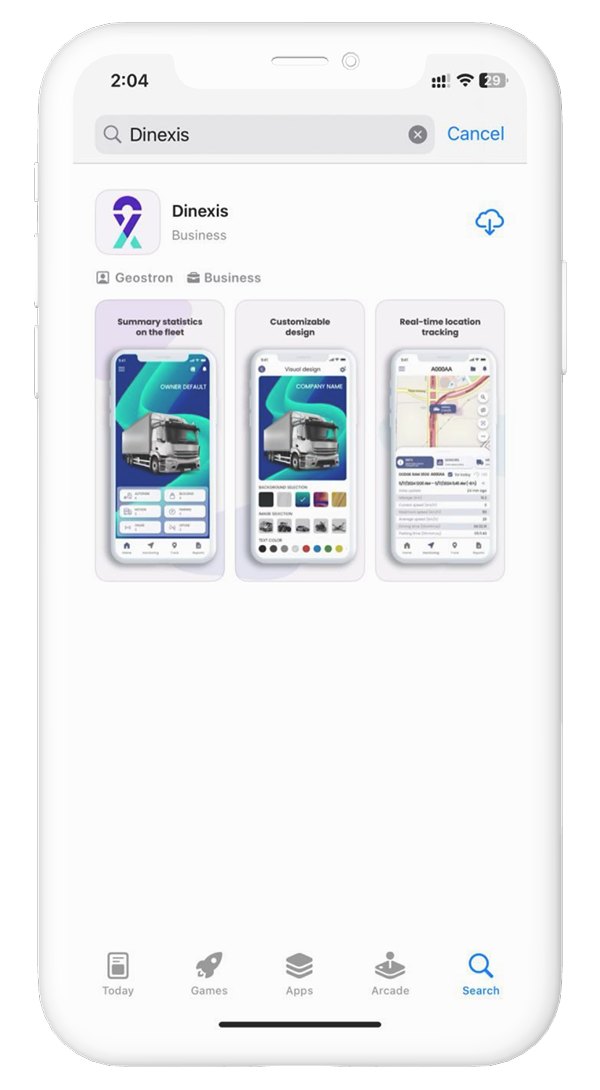 How to install the app to IOS
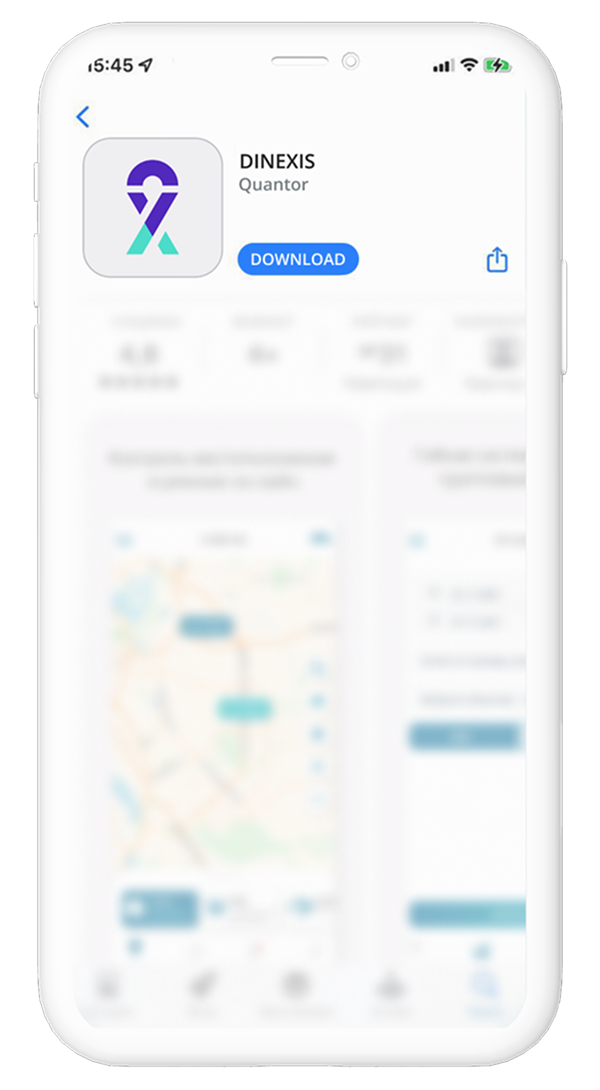
Go to App Store and search for Dinexis. Click LOAD:
How to install the app to IOS
Go to App Store and search for Dinexis. Click LOAD:
How to update the app
You can easily update Dinexis in the app store in your smartphone. We recommend using the latest
version of Dinexis available, as we are constantly working on new features and bug fixes. Android Go to the Google Play Market and search for Dinexis using the search. Click UPDATE:
iPhone Go to the App Store (link) and search for Dinexis using the search. Click UPDATE:
Account and profile
How to view app capabilities without registration
A demo mode is provided to view capabilities of the Dinexis app without registration.
You need to install the app and click Demo in a registration window.
When using the demo mode, you will have access to a group of monitoring objects for a full view of
all the functions of the application.
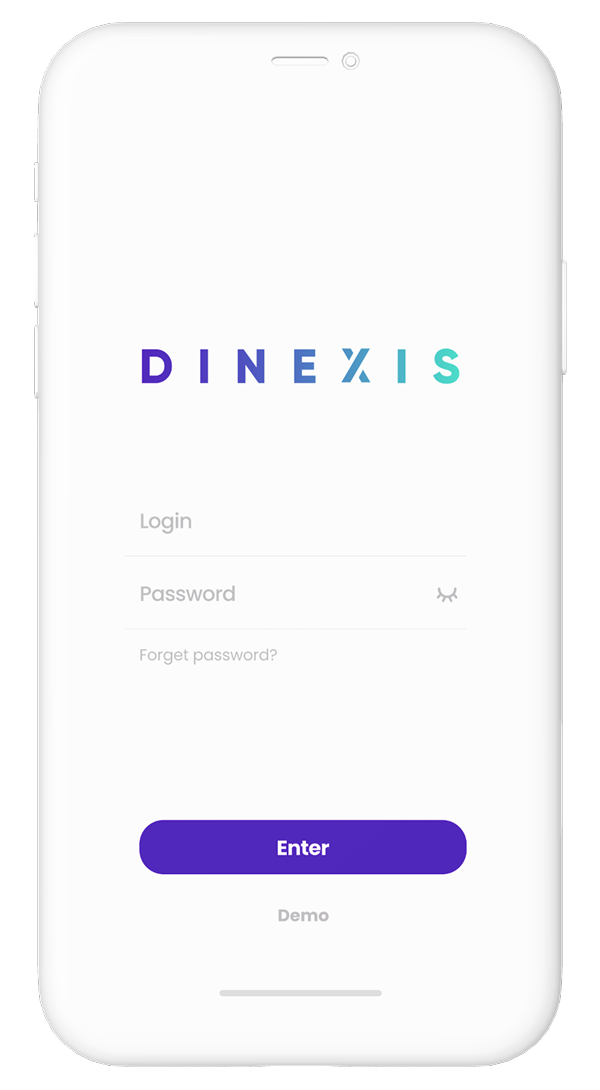
How to get login and password
User authorization data is provided by a developer company. To obtain login and password, you can
contact the company:
info@dinexis.org - technical support*If you are a WEB Dinexis user, you can use the same login and password.
*If you are an employee of a company that already uses Dinexis, you will need to contact your company system administrator to obtain login and password.
How to recover login and password
To recover login and password, you can contact the company:
info@dinexis.org - technical support*If you are a WEB Dinexis user, you can use the same login and password.
*If you are an employee of a company that already uses Dinexis, you will need to contact your company system administrator to obtain login and password.
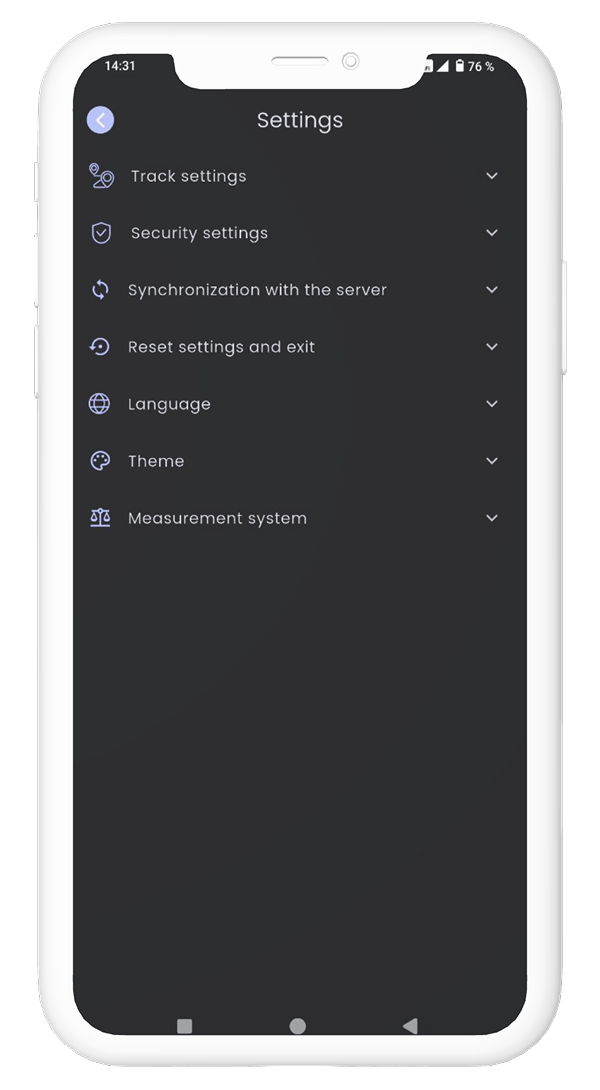
Settings
How to set up track line and marker size
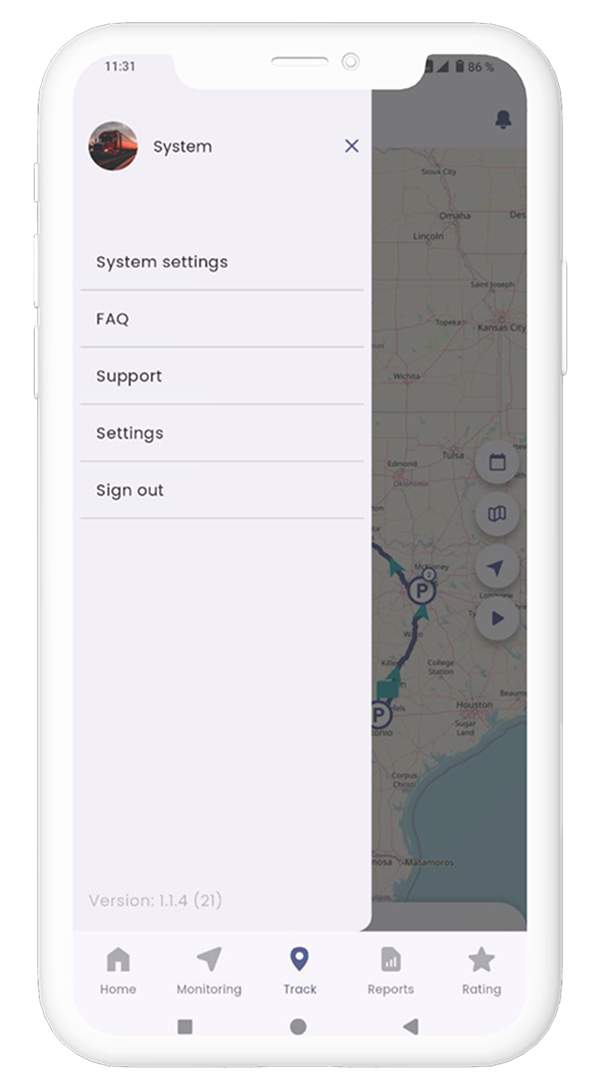
Click on the "Menu" icon on the main screen of the app on the upper left corner
Then select "Settings" from the menu that appears
 Select the "Track settings" item from a list of settings:
 A preview mode is built in for convenience on a screen that appears. You can view and select the
most comfortable display of a track line and marker sizes for yourself there.
A preview mode is built in for convenience on a screen that appears. You can view and select the
most comfortable display of a track line and marker sizes for yourself there.
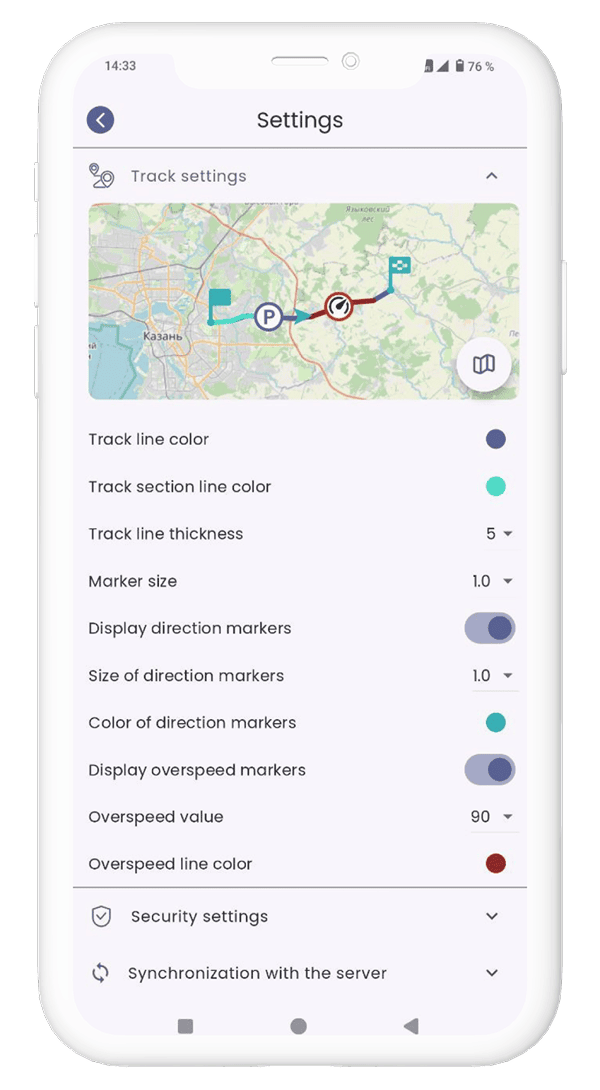 Track settings include the following items:
• Track line color;
• Line color of a track area;
• Track line thickness;
• Size of markers;
• Size of direction markers;
• Color of direction markers;
• Overspeed values;
• Color of an overspeed line;
How to set up an additional passcode or biometric login
Click on the "Menu" icon on the main screen of the app on the upper left corner
Then select "Settings" from the menu that appears
Select the "Security Settings" item from a list of settings:
Set the switch to the on position in an expanded tab, and enter the password twice to confirm. After
that, if your device supports fingerprint login, you can also enable biometric login by setting the
switch to on
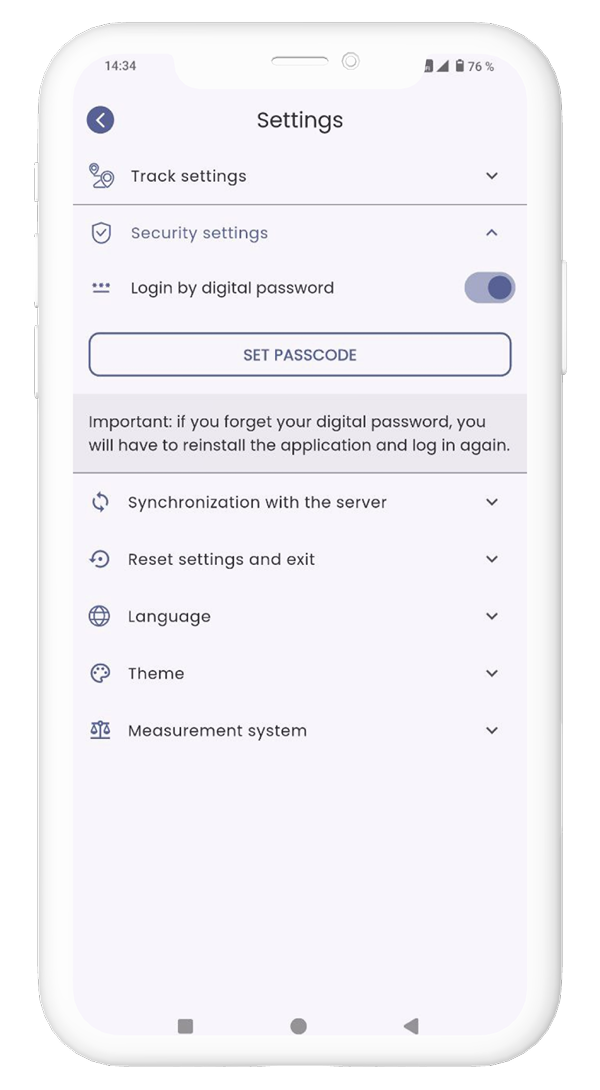 If you need to set a new passcode, click the “Set Passcode” button and enter a new passcode twice.
If you want to disable login by passcode or biometrics, move the "Login by digital password" switch
to the off position
If you need to set a new passcode, click the “Set Passcode” button and enter a new passcode twice.
If you want to disable login by passcode or biometrics, move the "Login by digital password" switch
to the off position
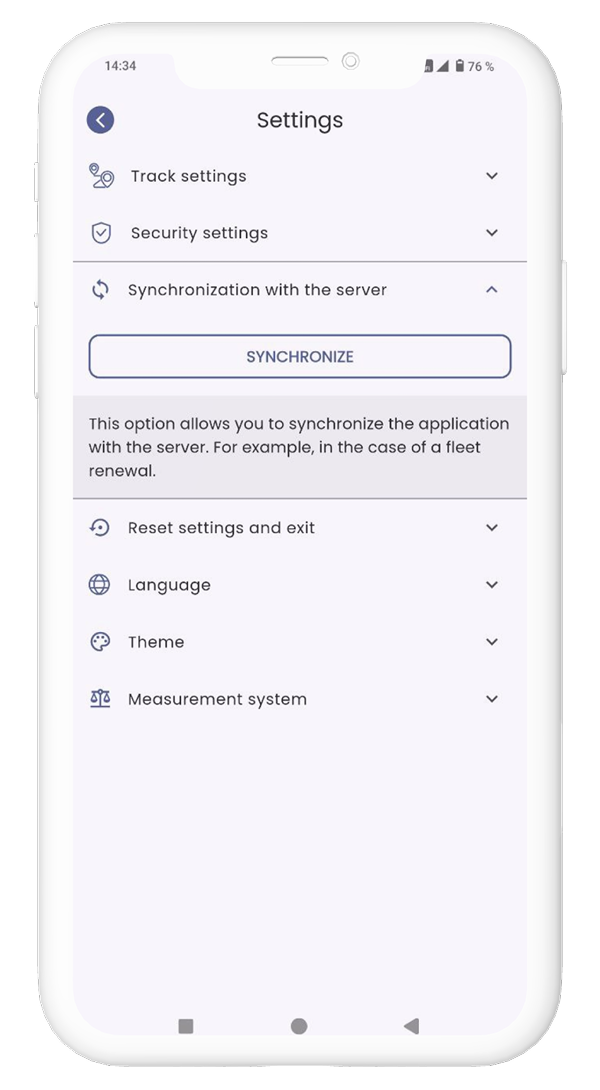
How to sync with the server
In some cases, for example, after updating a fleet, it becomes necessary to update a list or names
of objects. Click on the "Menu" icon on the main screen of the app on the upper left corner Then
select "Settings" from the menu that appears.
From a list of settings, select the "Synchronization with the server" item:
Click the "Synchronize" button in an expanded tab
How to reset application settings
Click on the "Menu" icon on the main screen of the app on the upper left corner
Then select "Settings" from a list that appears
Among the list of settings, select "Reset settings and exit".
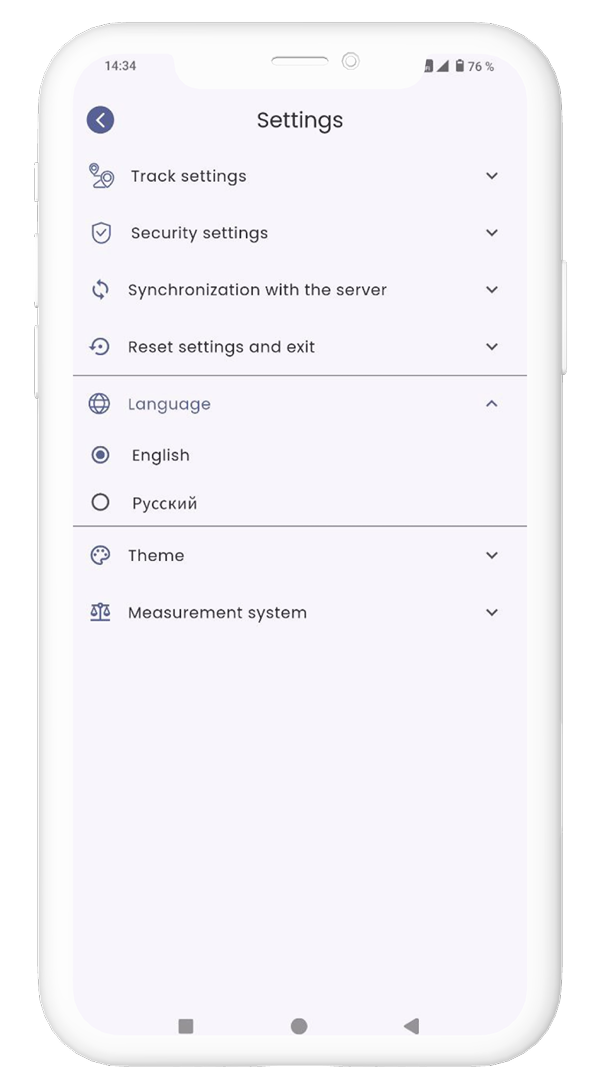
How to change the app language
Click on the "Menu" icon on the main screen of the app on the upper left corner
Then select "Settings" from a list that appears
From a list of settings, select the "Language" item:
Select the required language in a list that appears
How to change the application theme
Click on the "Menu" icon on the main screen of the app on the upper left corner
Then select "Settings" from a list that appears
In the list of settings, select "Theme":
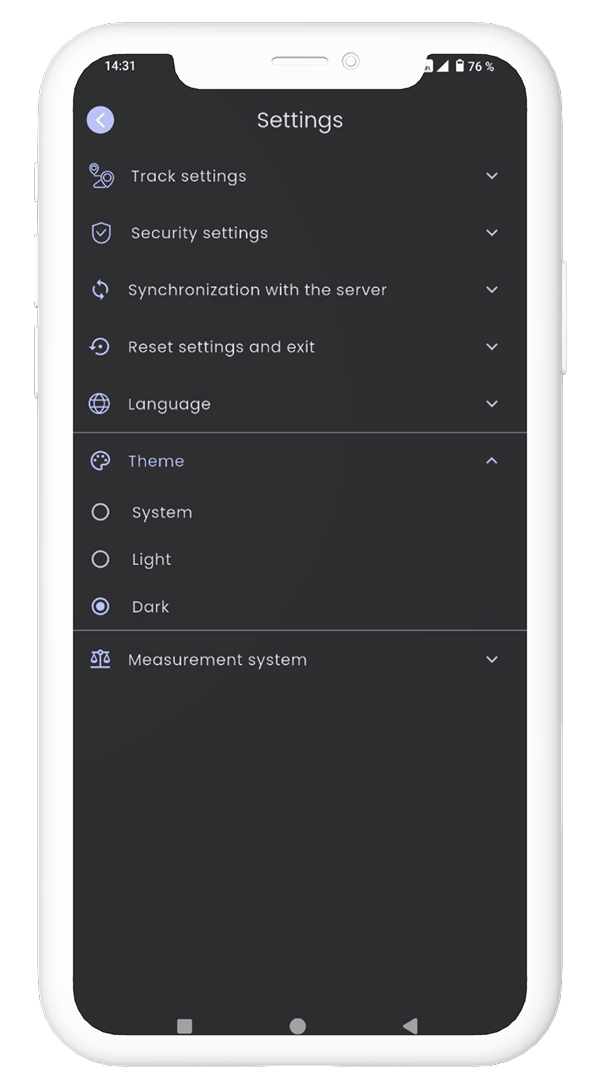 In the list displayed, select the desired design theme.
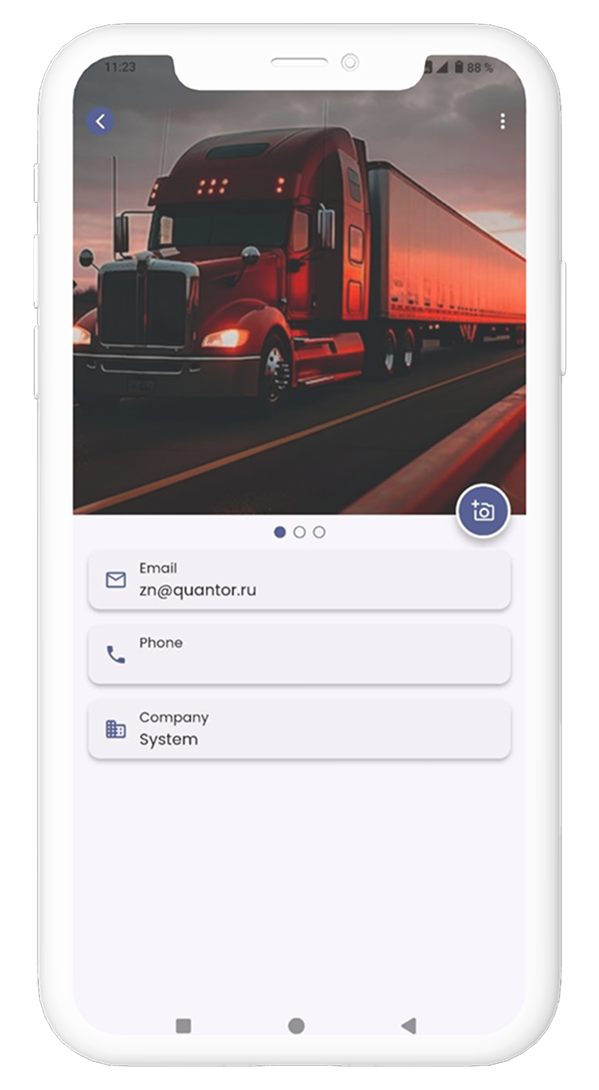
How to upload or delete an avatar
In the upper left corner, click on the “Menu” icon and click on the profile icon or your name. In
the user profile that opens, tap the photo icon located on the avatar circle. You may need
additional permissions to access the images on your device.
To delete an avatar, go to your user profile, tap on the avatar and hold until it disappears.
How to add a picture to the home screen
On the home screen of the app, tap on the “Appearances” icon. In the window that opens, in the image
selection section, tap on the “Add” button and select one of the picture design options. Next,
select and upload an image. The uploaded image will appear at the end of the list of images, select
it if you want to use it as a screensaver.

Search and select standard images on the Home screen
On the main screen of the application, tap the “Appearances” icon. In the window that opens, in the
image selection section, tap on the “Search” button. In the search box that opens, enter the make or
model of car you are interested in. You can also use the filter. In the list, select a suitable
variant that will be automatically set as a screensaver.
Monitoring
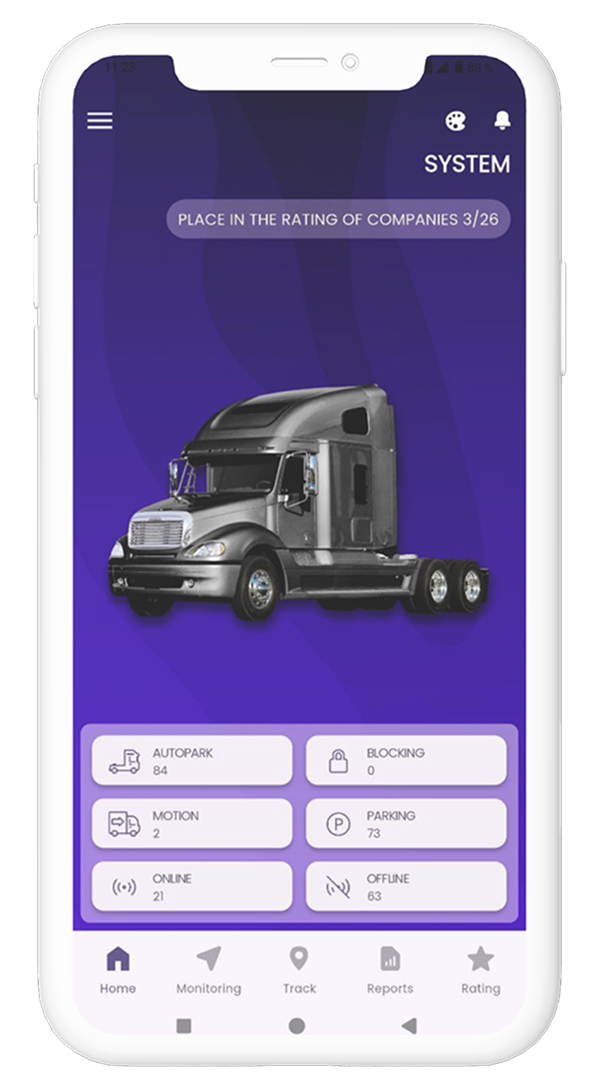
How to view fleet statistics
Go to the “Home” page, the list shows the number of cars in motion, parked, blocked, online and
offline. Click on the button to get the list of cars.
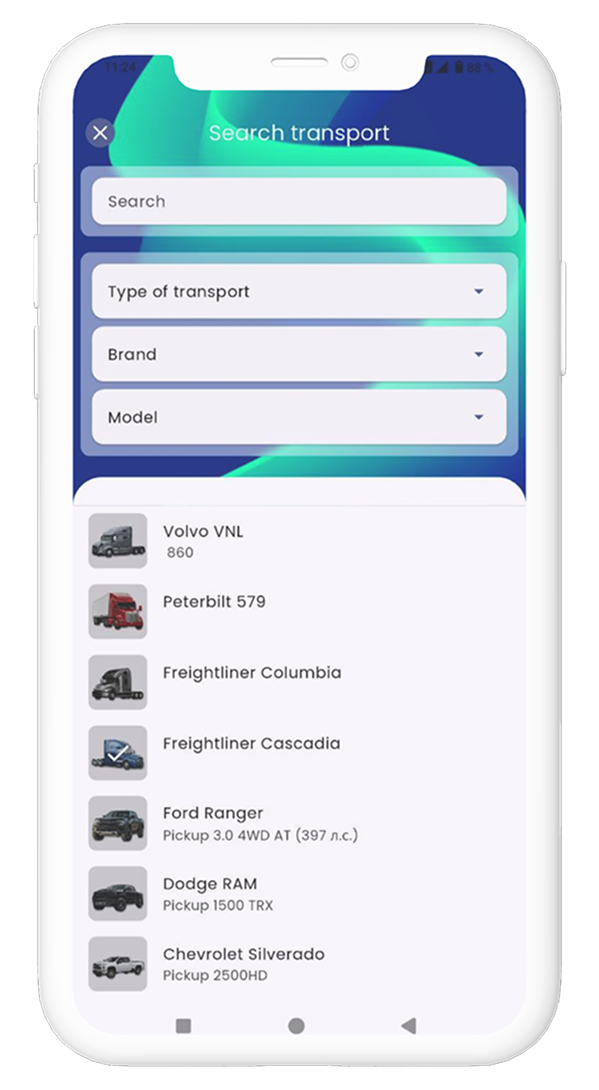
How to select monitoring objects
Go to a directory section of monitoring objects
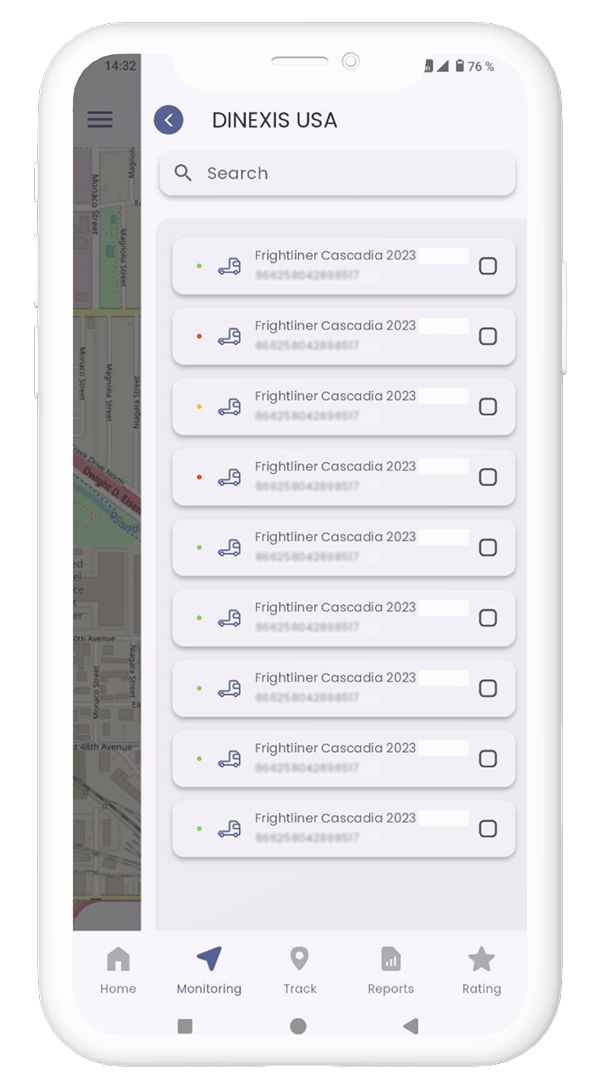 Enter a name of an object in the search bar or find it in the list. Check the box next to a selected
object (you can select several objects or a group at the same time)
Return to the main screen of the app. The objects you have selected will appear on the map
Enter a name of an object in the search bar or find it in the list. Check the box next to a selected
object (you can select several objects or a group at the same time)
Return to the main screen of the app. The objects you have selected will appear on the map
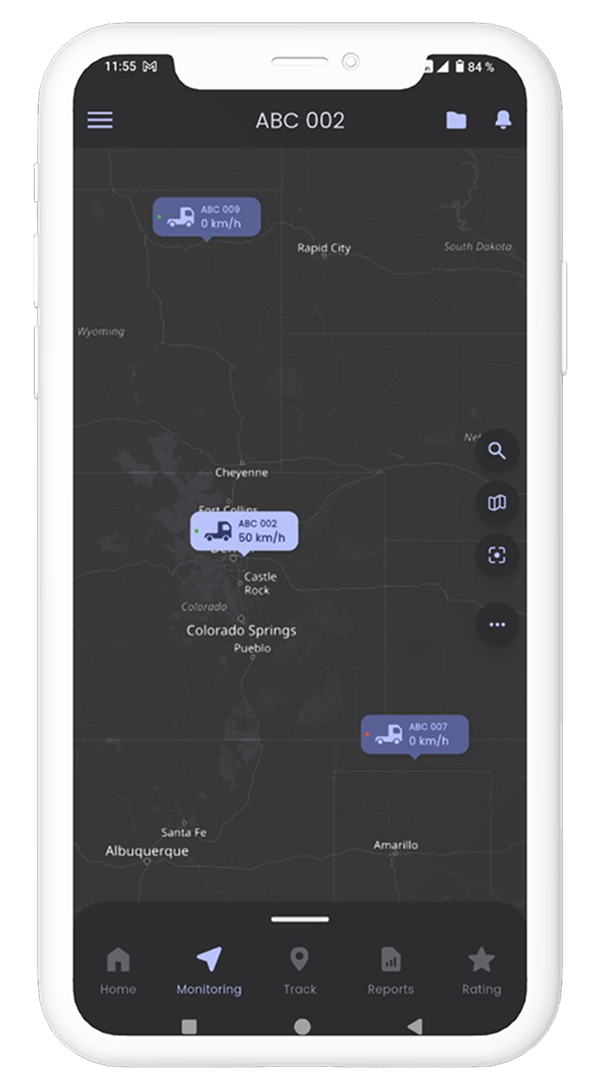
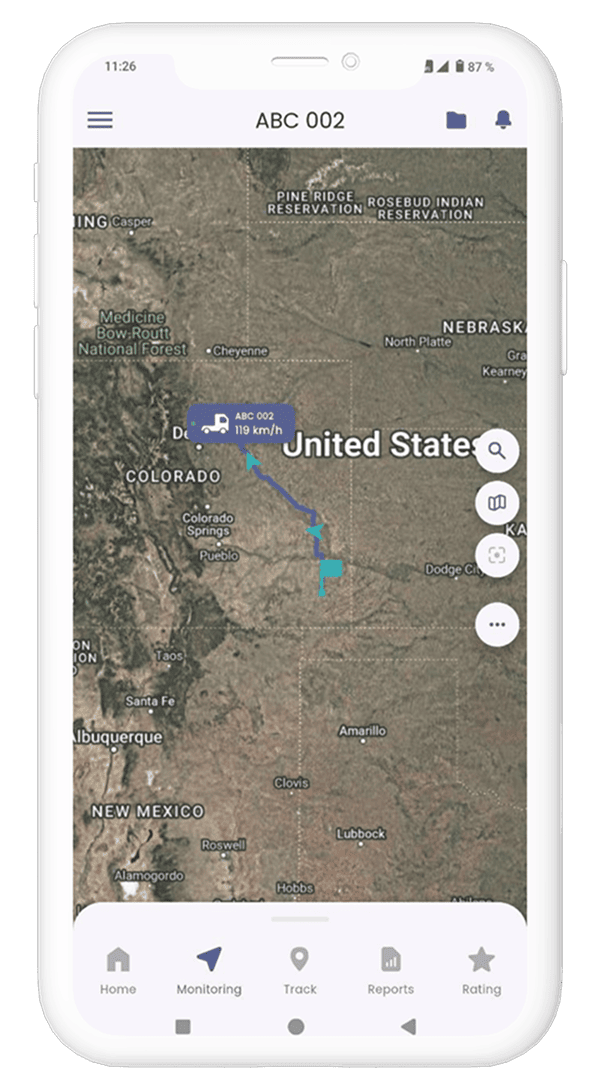
How to view information about a monitoring object
Select a monitoring object (see section "How to select a monitoring object")
Click on an object icon on the map. A menu will appear at the bottom of the screen:
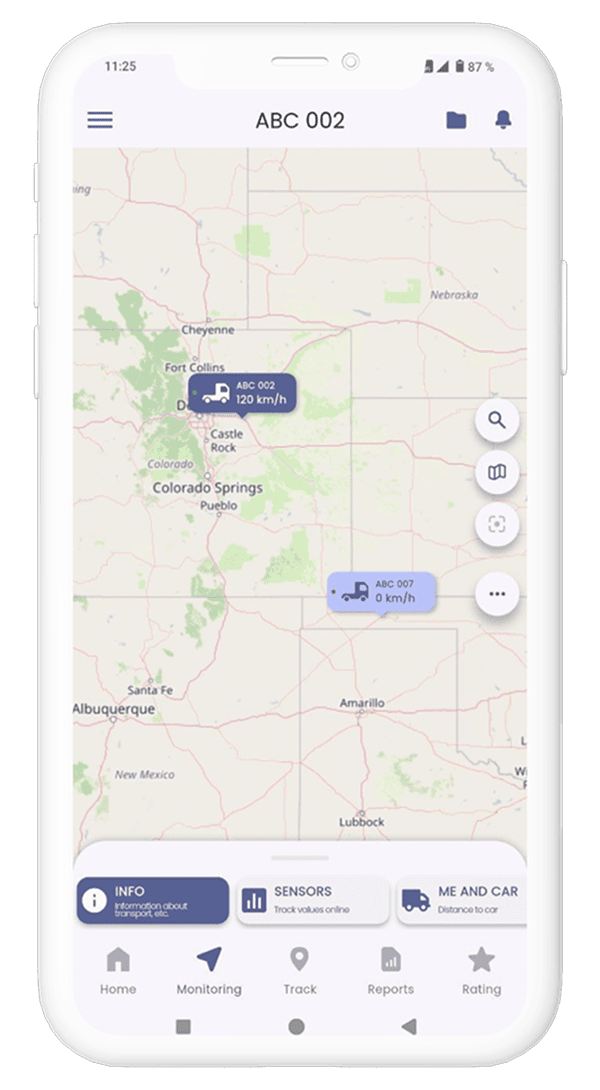 Click on the INFO section or drag the menu up:
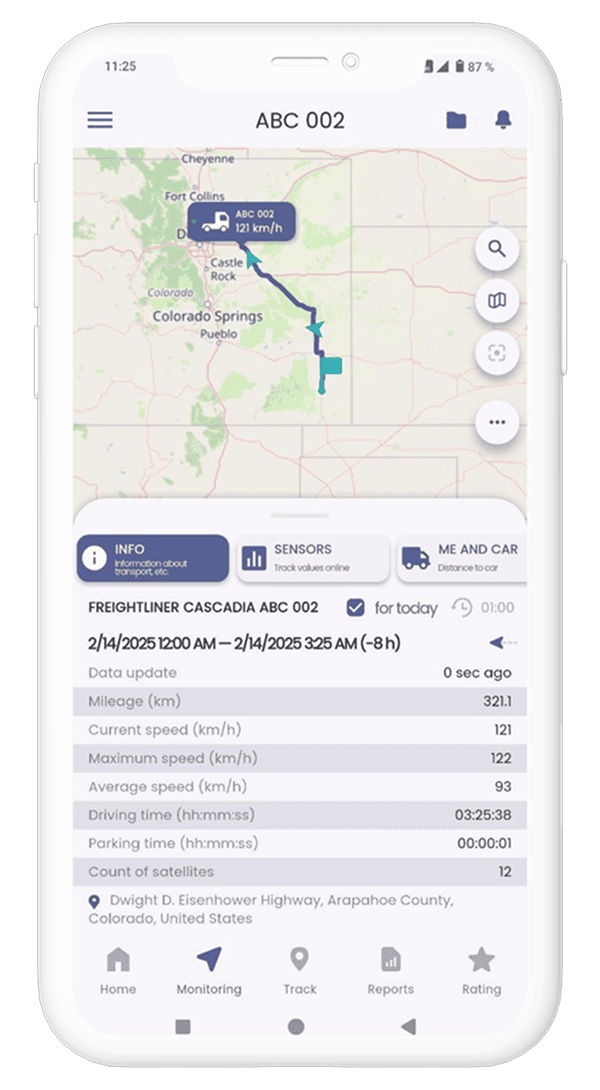
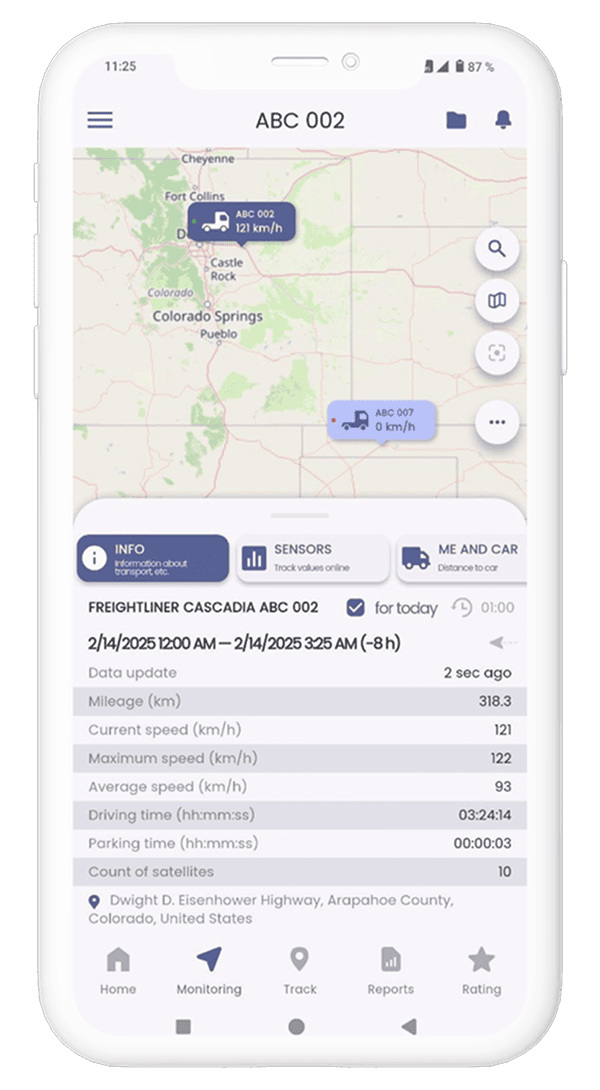 To see a route and data for the day, turn on the "Track online" mode
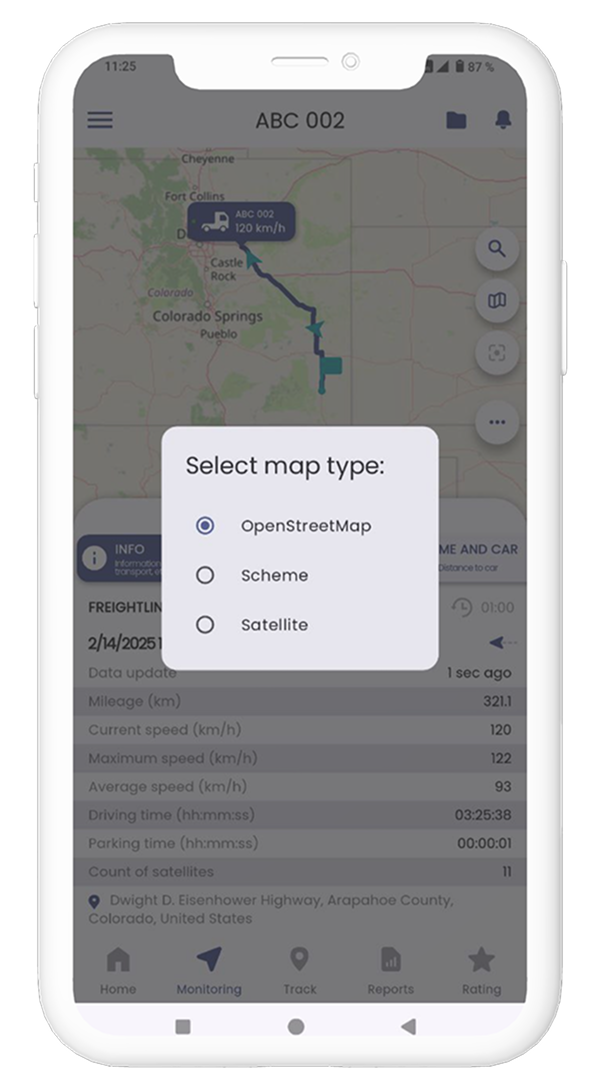
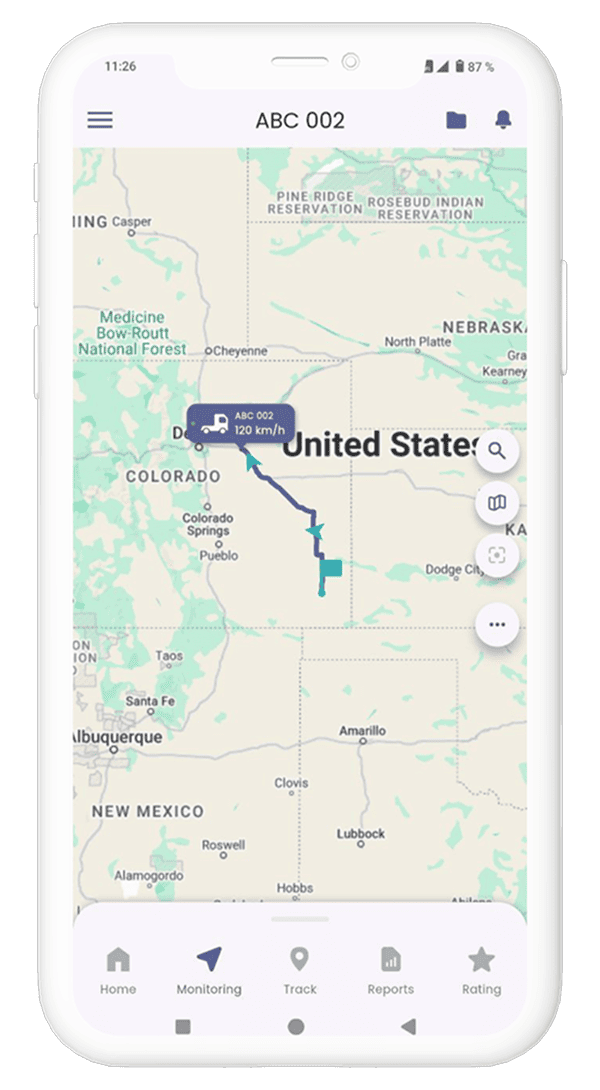
How to change map type
Click on the map selection icon, select type in a modal window that opens:• OpenStreetMap
• Scheme
• Satellite
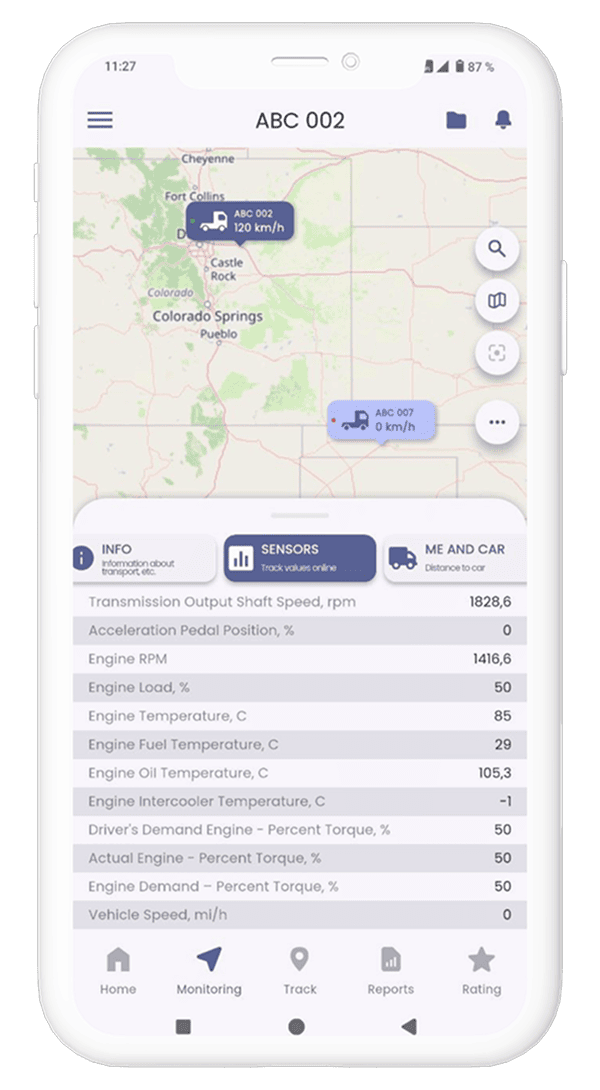
How to view sensor data online
Click on the “Sensors” tab in the monitoring window. It will display online data on connected
sensors
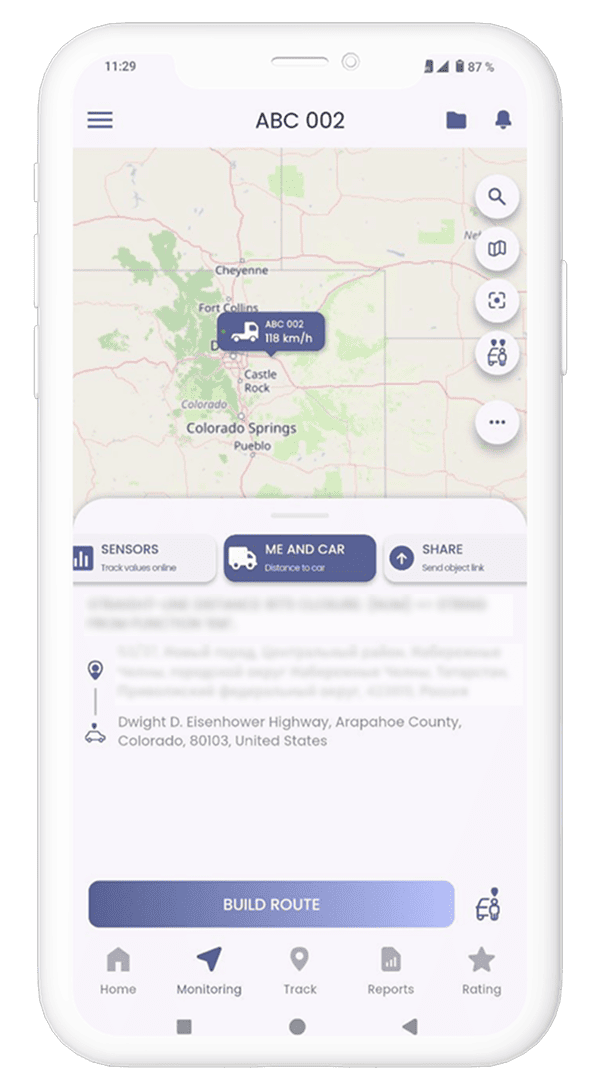
How to use the “Me and Car” function
Press the "other functions" button located in the right row of function buttons in the monitoring
mode, a circular menu will open with additional functions:• "Geozone" (this function is under development)
• "Me and Car" - shows geolocation of a smartphone or a selected object, depending on the position of a button for quickly switching between "My Location" or "Object Location" modes
• "Track online" - shows a track line for the last 2 hours
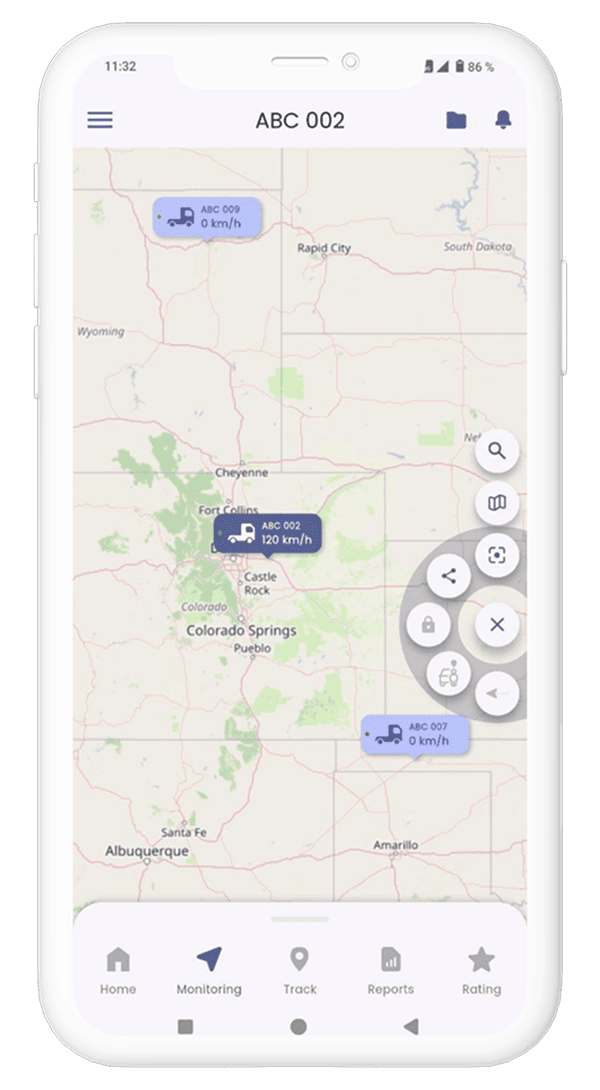 Next, press the "Me and Car" button, an additional button for switching the modes "My location and
location of an object", "My location", "Location of an object" is activated. In the "My location and
location of an object" mode, the map will show location of an object and geolocation of a
smartphone, and the "My location" and "Location of an object" modes will show geolocation of a
smartphone and a selected object, respectively
Next, press the "Me and Car" button, an additional button for switching the modes "My location and
location of an object", "My location", "Location of an object" is activated. In the "My location and
location of an object" mode, the map will show location of an object and geolocation of a
smartphone, and the "My location" and "Location of an object" modes will show geolocation of a
smartphone and a selected object, respectively

How to create a route to an object
Сlick on the "Me and car" tab in the monitoring window, then activate the me and car mode using the
switch so that the "Build a route" button becomes active. Press the build route button, as a result,
a route will be laid from you to an active object.
How to share your location or location of an active object
To share location of an active object, click on the marker in the monitoring window and hold it for
a few seconds until a pop-up window appears with possible options of applications through which you
can share a link
To share your location, activate the “Me and car” mode in the monitoring window, click on the marker
of your location and hold it for a few seconds until a pop-up window appears with possible options
of applications through which you can share a link
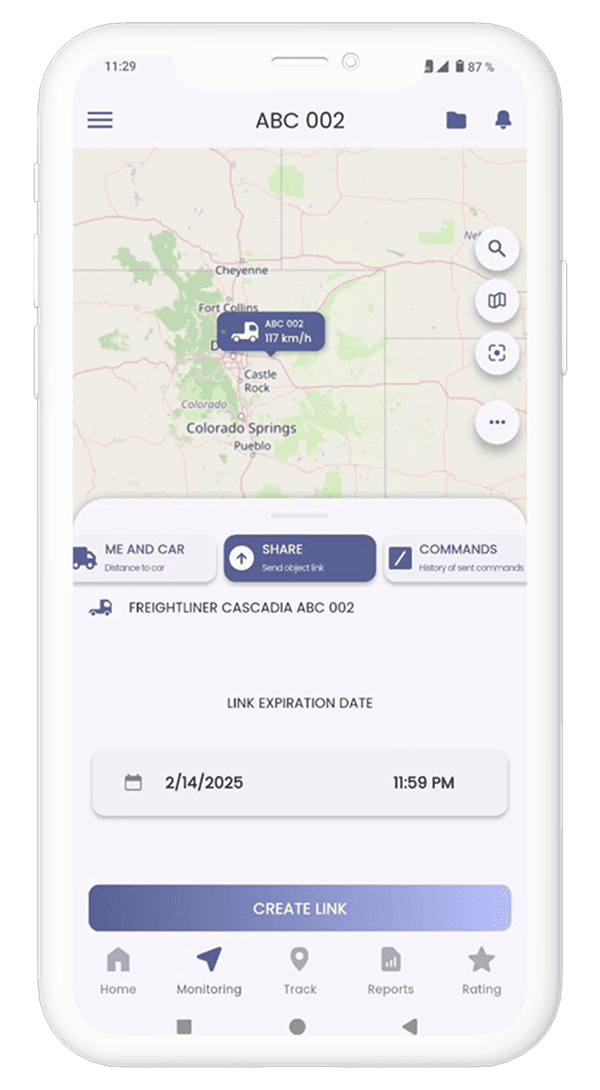
How to temporarily share monitoring of an active object
To share monitoring of an active object, click the share tab in the monitoring window. Select an
expiration date for a link (up to 30 days is available) and click the "Generate Link" button, after
which a pop-up window will appear with possible options of applications through which you can share
a link
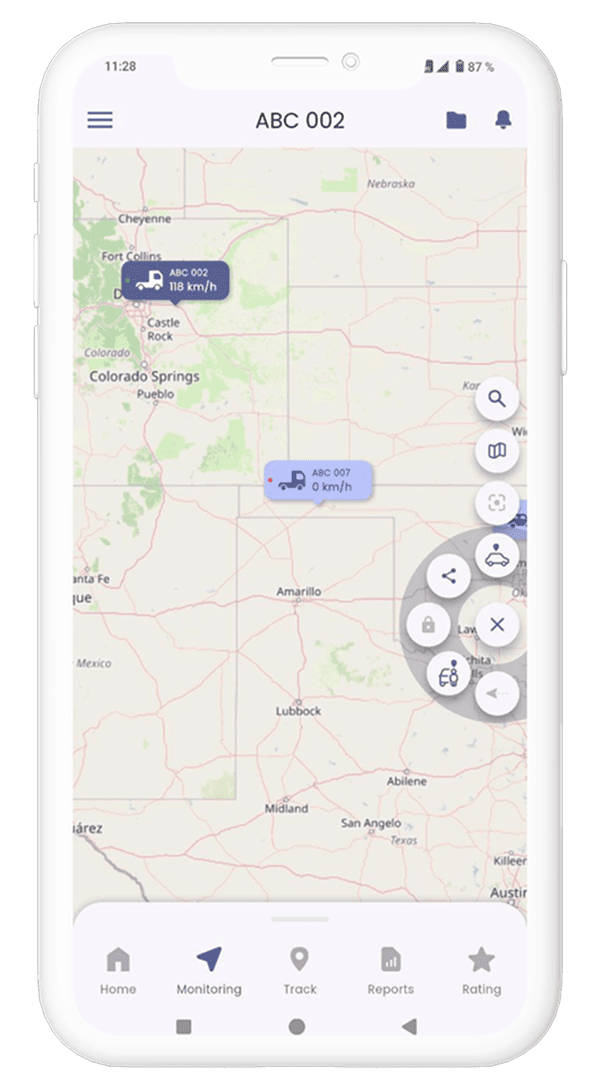
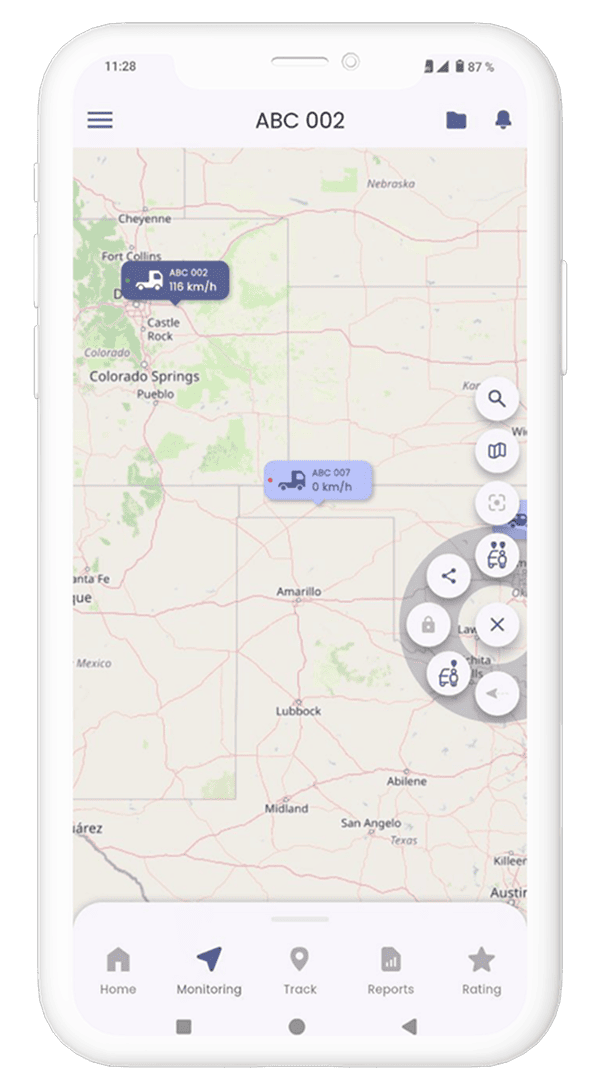
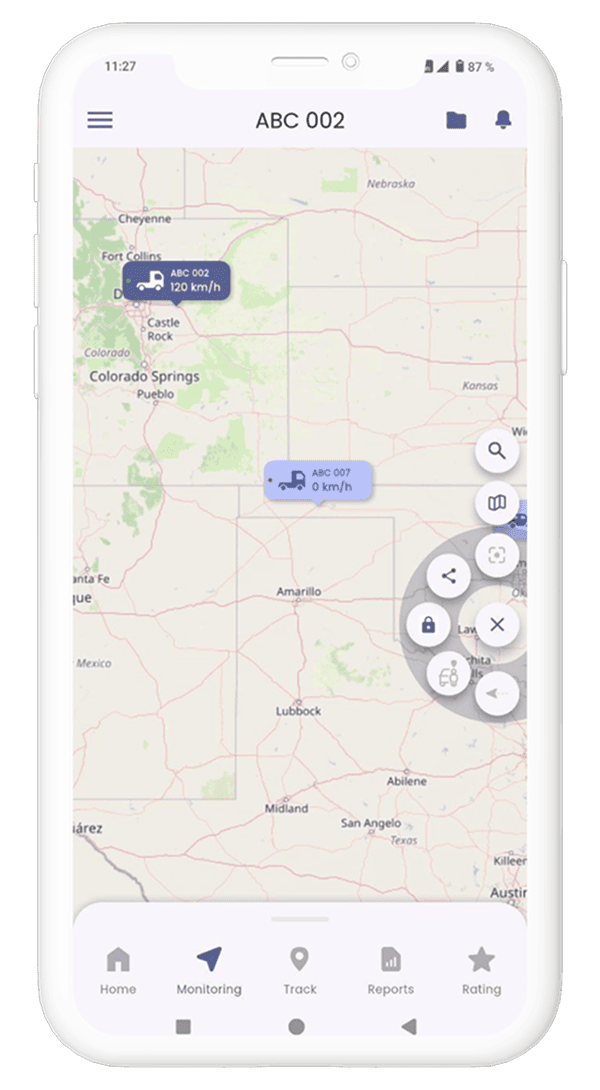
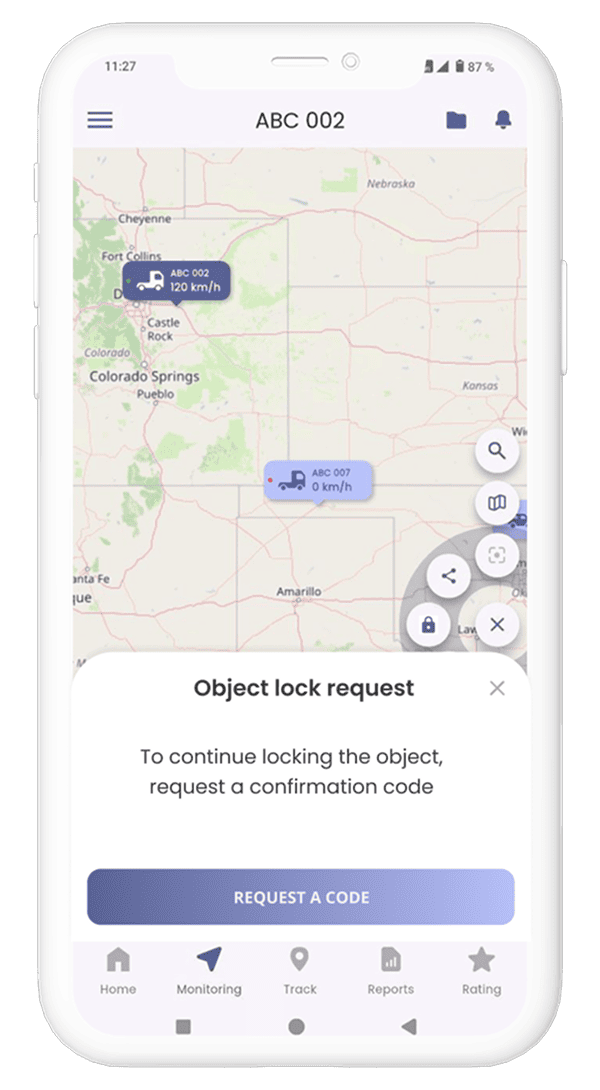
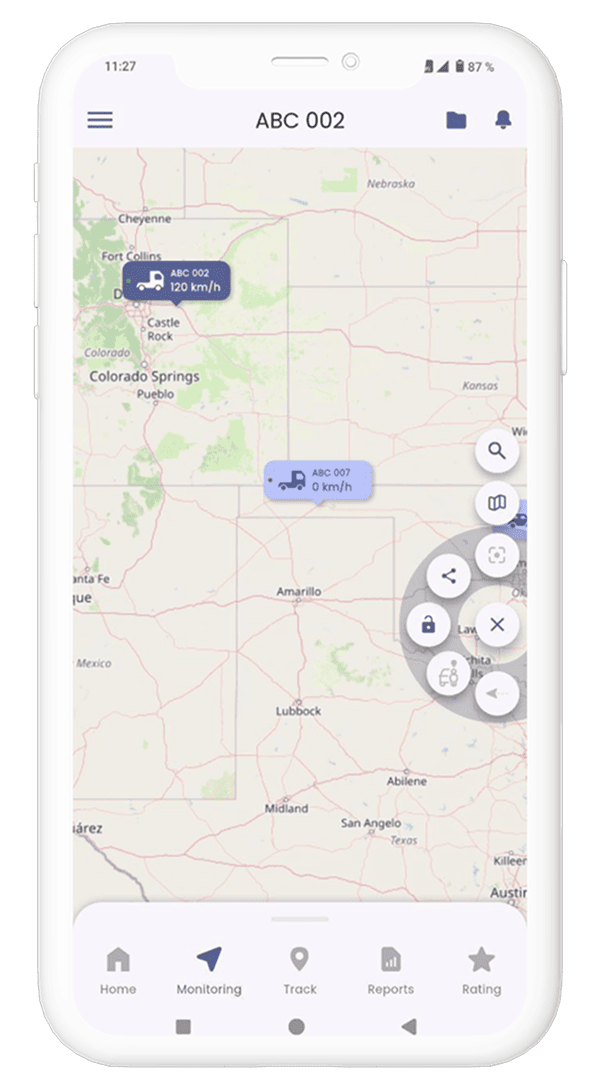
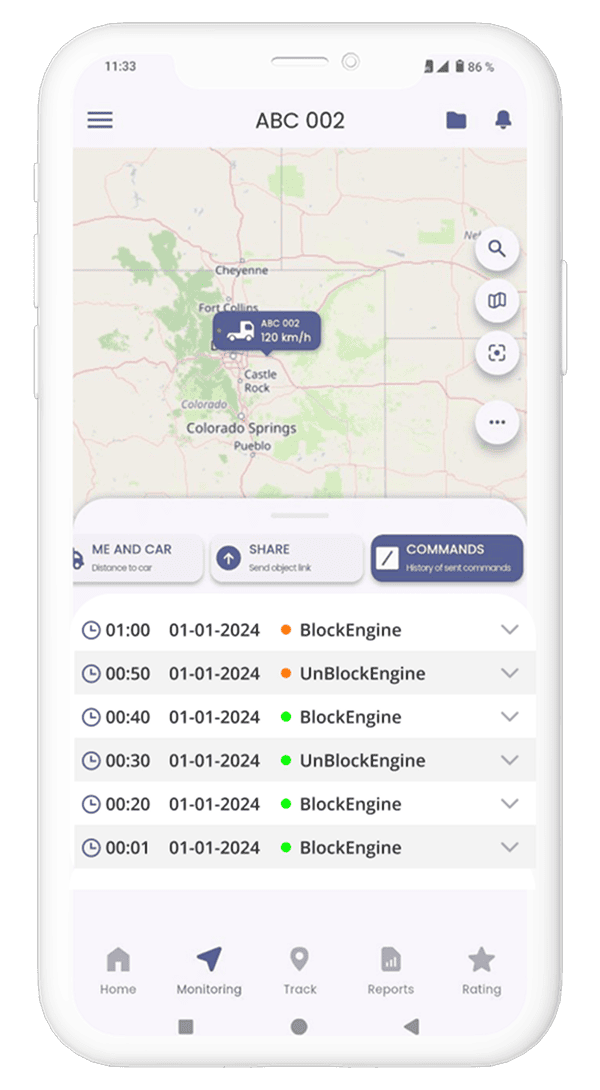
How to use the object lock function
In monitoring mode, press the “other functions” button located in the right row of function buttons
to open a circular menu with additional functions:• “Object lock” - allows you to block the possibility of starting the engine by the driver (if the object is in motion, for safety reasons the activation of the function is postponed to the next engine start)
• “Me and Car” - shows the geolocation of the smartphone or the selected object, depending on the position of the ‘My Location’ or ‘Object Location’ shortcut button.
• “Track online” - shows the track line for the last 2 hours.
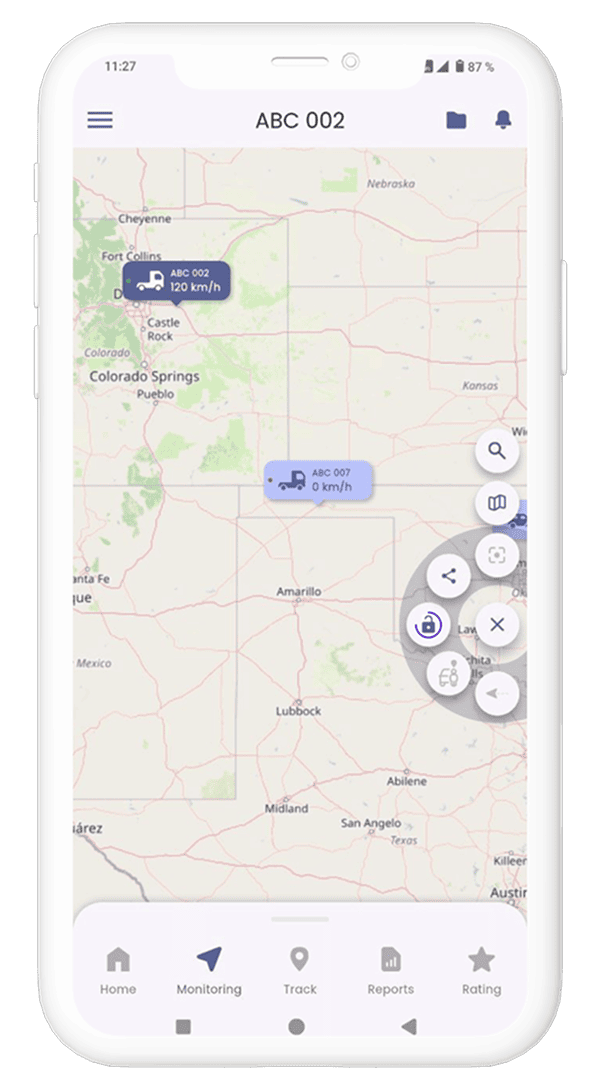
The function key has 4 states depending on the current status:
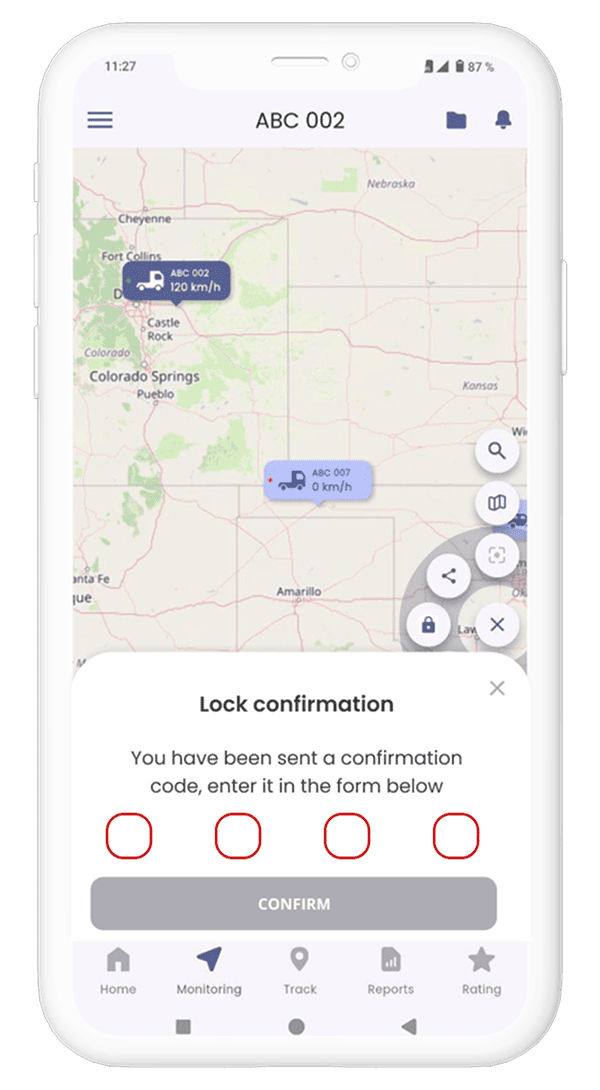
• “Lock” - allows you to lock the object (icon in the form of a closed lock). When you click on the button, the window of object locking request will appear. In it you will need to request a confirmation code, to do this, click on the “Request code” button. Then you will receive a push-message with a confirmation code, which must be entered and confirmed. If the code is valid, the object locking process will start
• “Unlock” - allows to unlock the object (icon in the form of an open lock) by requesting and confirming the code.
• “Pending unlock” - the status indicates that the unlock process is already started (icon in the form of an open lock with a circular process-indicator), but allows to cancel it and start the lock process by requesting and confirming the confirmation code.

* The “Object Lock” function is available as an additional service, please check the cost and possibility of connection with the support service.
Track
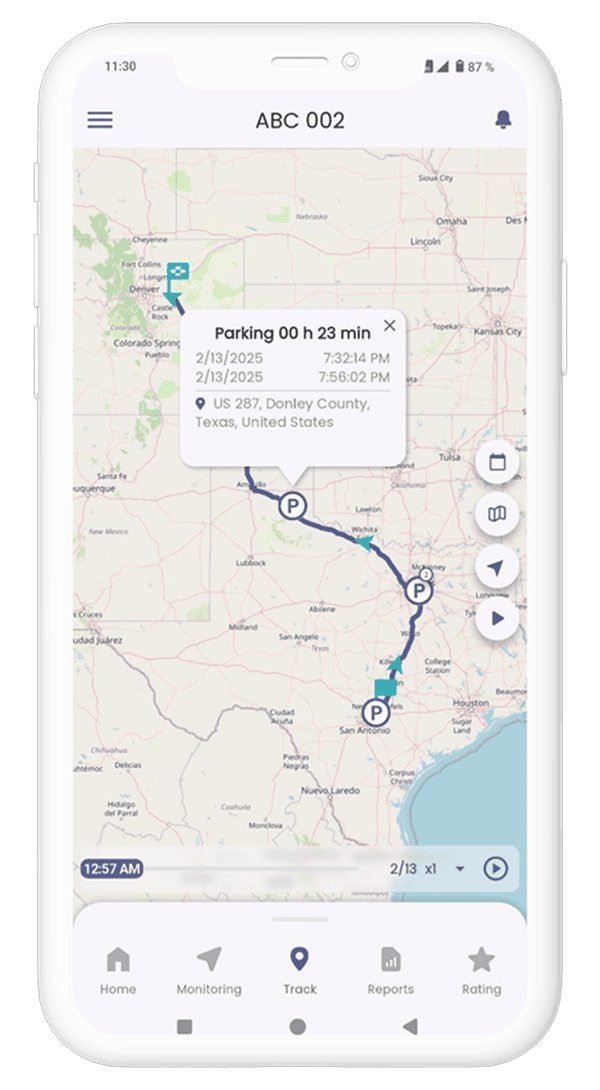
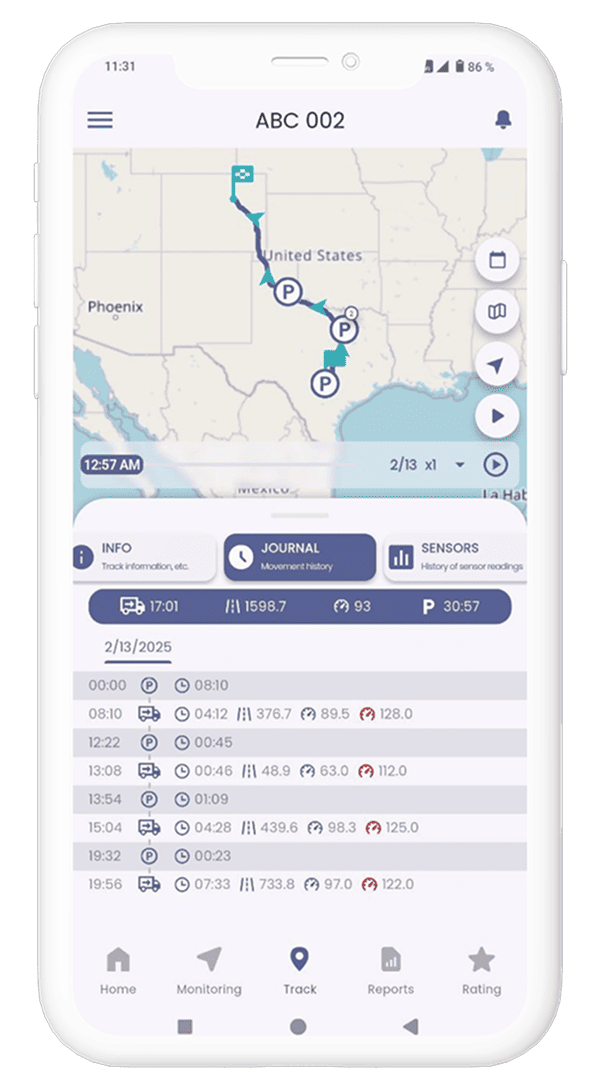
How to request a track
Click on the TRACK section. Set a time interval. Select an object. Click REQUEST
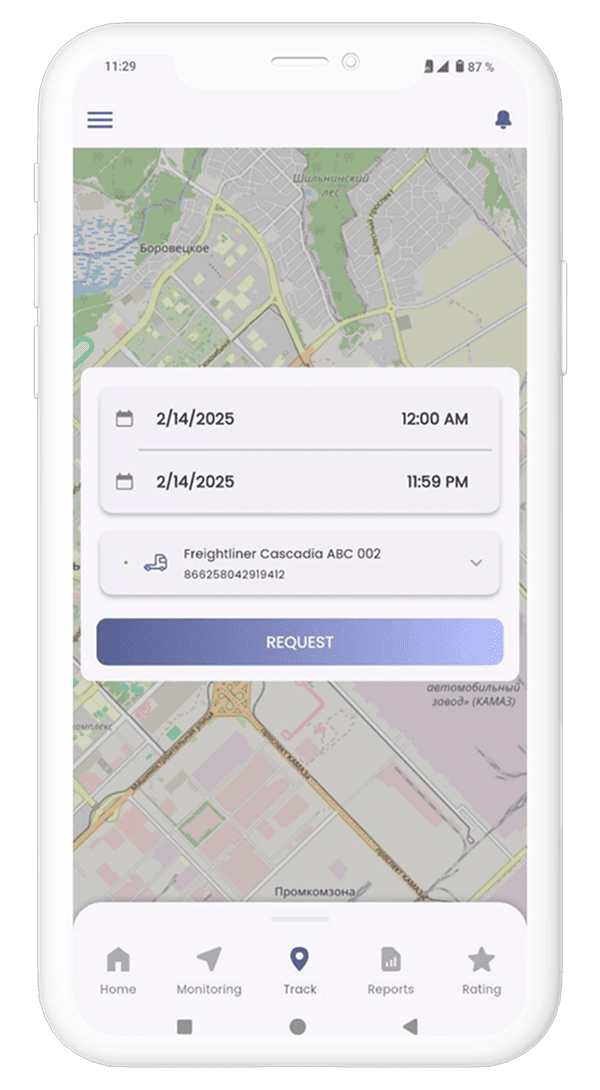 As a result, a track line for a selected time interval will appear on the map (if an object was
moving). A menu with detailed information will appear at the bottom of the screen. To view data,
drag the menu up:
As a result, a track line for a selected time interval will appear on the map (if an object was
moving). A menu with detailed information will appear at the bottom of the screen. To view data,
drag the menu up:
Where to see data on parking and movements
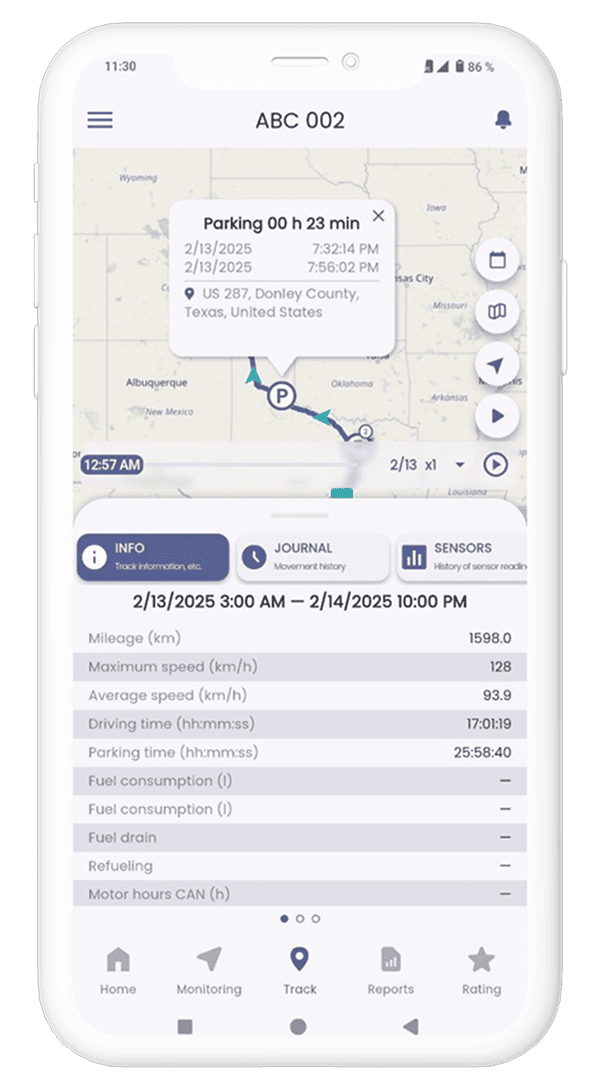
Сlick on the "Journal" tab in the track window, as a result, general and detailed statistics on
parking and movements will be displayed. A log has interactive functionality with displaying data on
the map, for this you need to click on general statistics, or on parking or movement points in a
general list of the log.
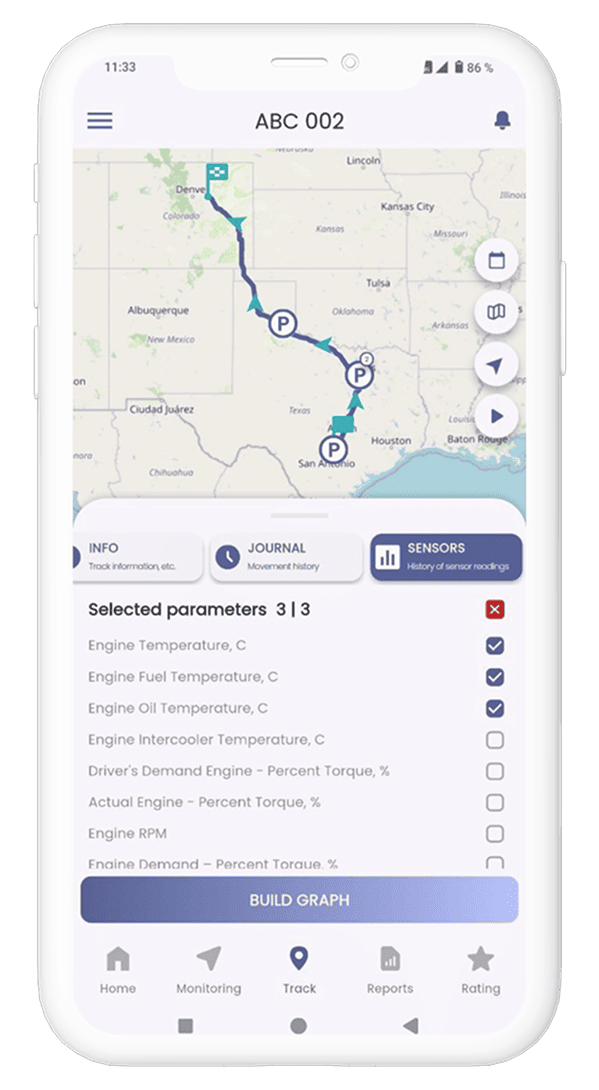
How to view the history of sensor readings
Click on the “Sensors” tab in the track window, as a result, a list of parameters (sensors) will be
displayed. To view the history, select parameters you are interested in (maximum three parameters),
click on the "Build Graph" button
 As a result, a graph will be generated from the selected parameters. If you click on a section of
the chart you are interested in, then a marker will be displayed on the map showing which section of
the route this event took place in, and the corresponding data will be displayed in the bottom panel
of the legend
As a result, a graph will be generated from the selected parameters. If you click on a section of
the chart you are interested in, then a marker will be displayed on the map showing which section of
the route this event took place in, and the corresponding data will be displayed in the bottom panel
of the legend
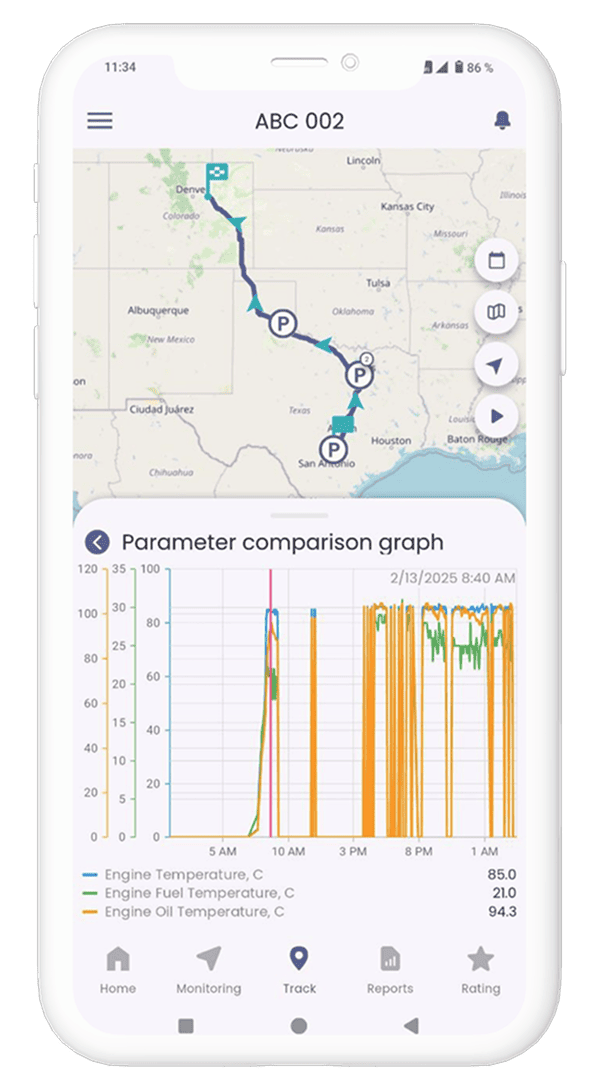 The graph has the functions of scaling and scrolling, as well as selecting a specific area on the
chart (to do this, hold your finger at the beginning of a proposed area on the chart for several
seconds until a selection area appears, then drag your finger to the end of the proposed area).
The graph has the functions of scaling and scrolling, as well as selecting a specific area on the
chart (to do this, hold your finger at the beginning of a proposed area on the chart for several
seconds until a selection area appears, then drag your finger to the end of the proposed area).
Report
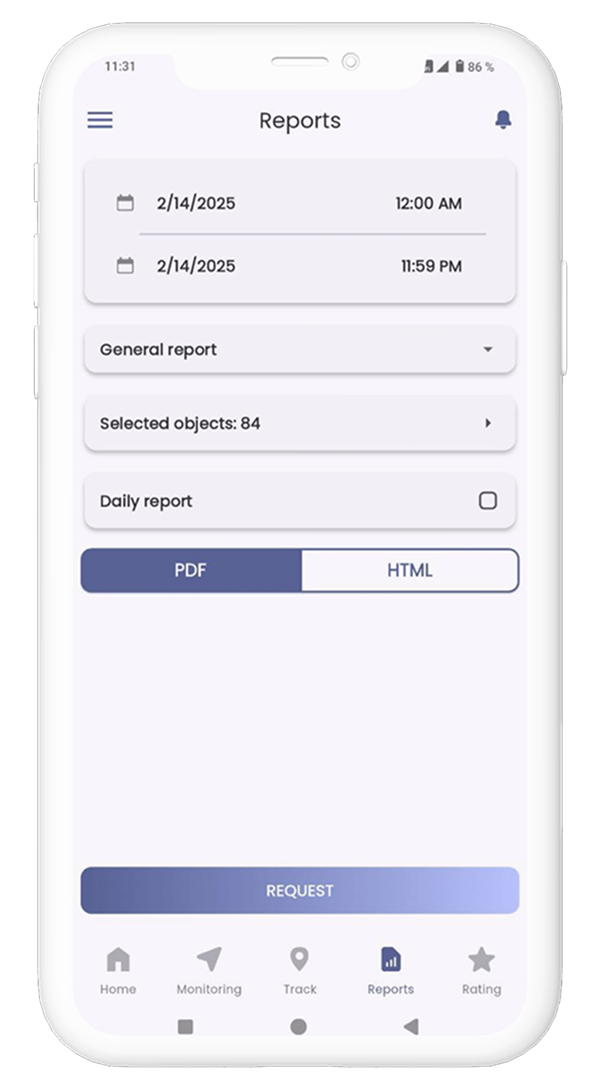
How to request a report
Select a time interval for which the report will be generated in the report window, then select one
of the reports from the drop-down list:• Report on fuel, motor hours, CAN
• Report on fuel, motor hours
• Parking report
Select objects for which a report will be generated
Select a report format PDF or HTML
Press the "Request" button
Rating
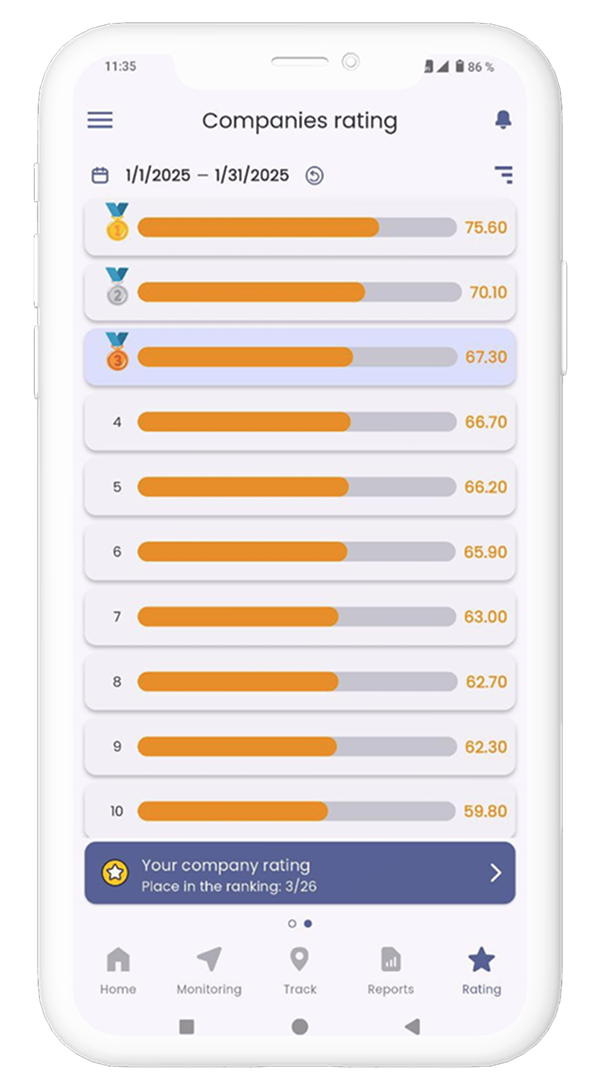
How to view company ratings
To view the company rating, click on the "Position in the company rating" on the main page or open
the "Rating" tab and swipe the screen to the left. By default, the rating list for the previous
month will be displayed.
The list shows information about your company's position in the overall rating, and the list of
companies is anonymized.
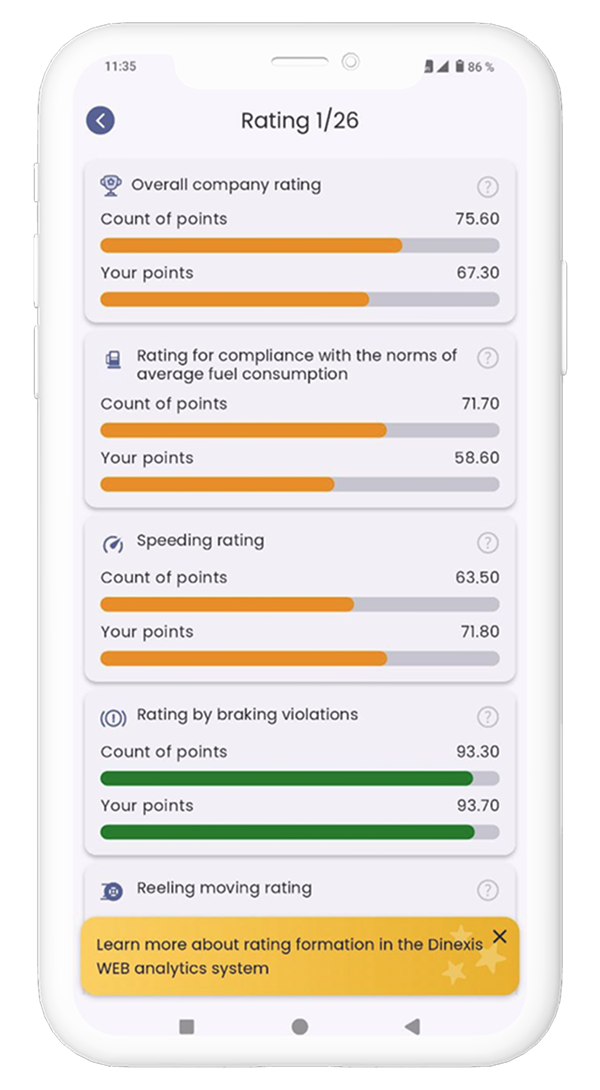
Detailed information about a participant company's rating includes the number of points based on the cases forming the rating and your points compared to the selected company.
The following cases are included:
- Overall company rating,
- Rating based on average fuel consumption norms,
- Rating based on speed violations,
- Rating based on braking violations,
- Rating based on coasting,
- Rating based on cruise control usage,
- Rating based on violations,
- Rating based on critical violations,
- Rating based on idle time,
- Rating based on meeting mileage norms.
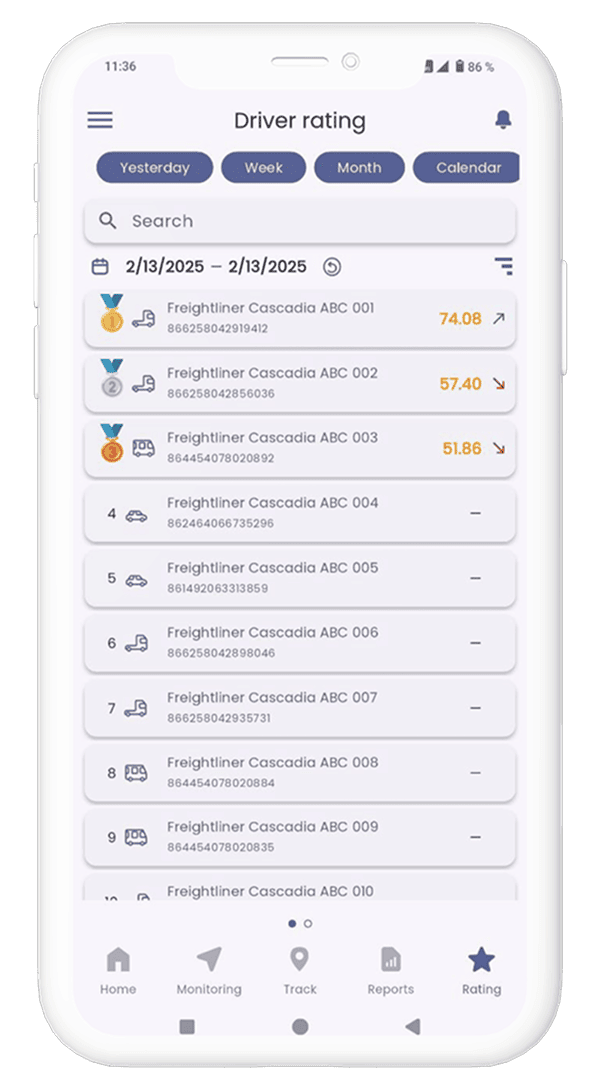
How to view driver ratings
To view a driver's rating, open the "Rating" tab. By default, the rating list for yesterday will be
displayed. You can also view the rating for the week, month, or any custom calendar period.
The rating list shows information about the position in the rating, brief information about the
object, the overall score, and the current trend in the form of an arrow.
When you click on one of the list items, detailed rating information will open (not available for
the driver role)
 To view detailed information about the driver’s rating, they need to click on the "View your rating"
card, after which a window with detailed rating information will open.
Detailed information about the rating includes:
To view detailed information about the driver’s rating, they need to click on the "View your rating"
card, after which a window with detailed rating information will open.
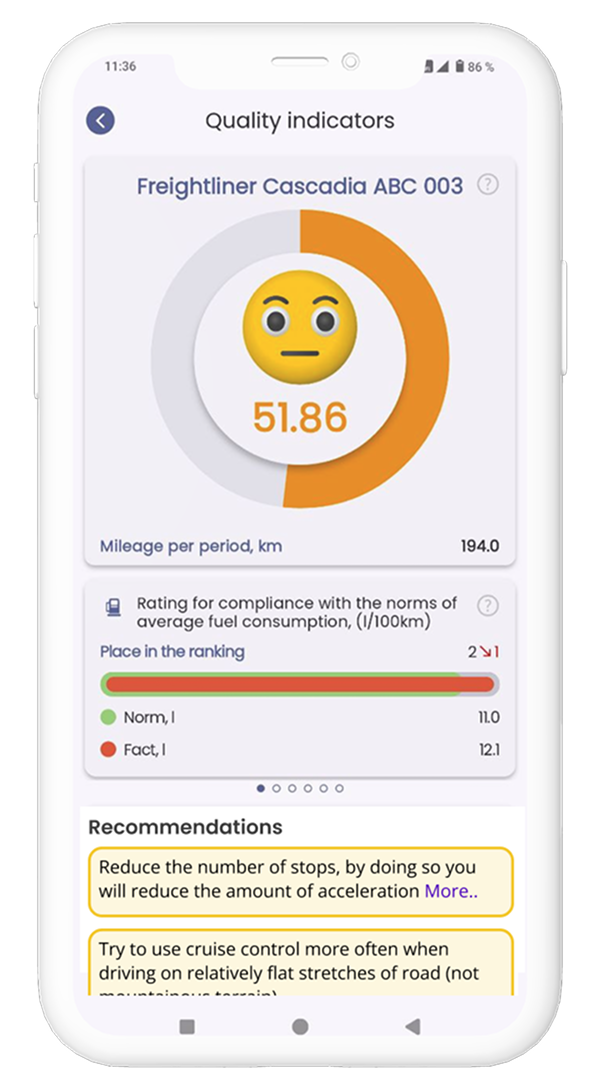
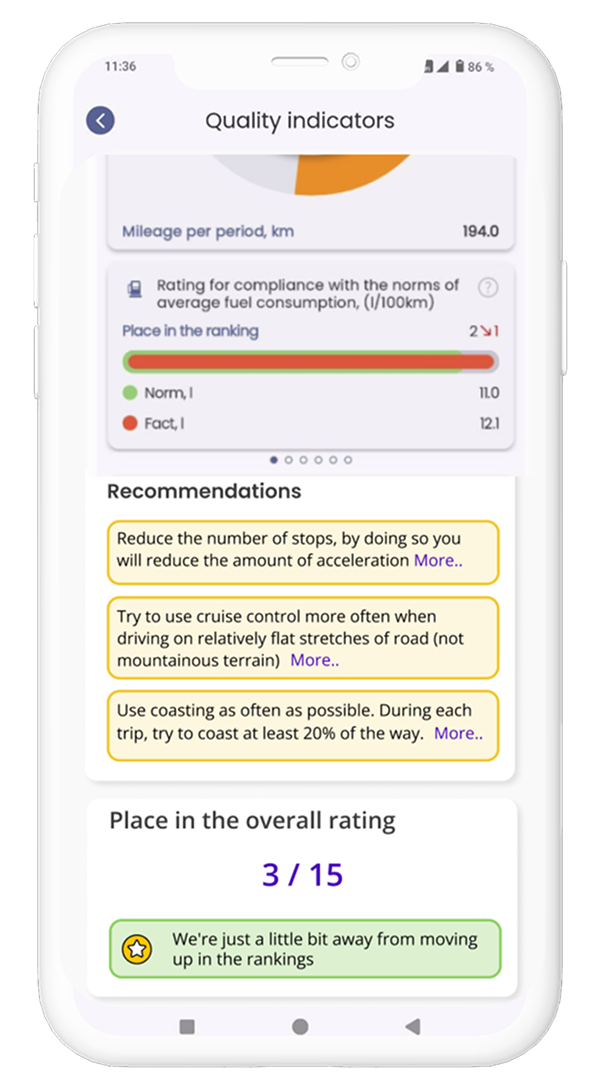
Detailed information about the rating includes: • A card with a circular diagram showing the overall score and an animated smiley. The overall score is the sum of points from the ratings in individual categories – "Cases". The maximum possible score is 100.
• A slider card with rating information for each case. The following cases are included:
• Rating for violations (Count/100 km),
• Rating for speed violations (Count/100 km),
• Rating for coasting (% of total mileage),
• Rating for critical violations (Count/100 km),
• Rating for meeting mileage norms (% of mileage relative to the norm),
• Rating for average fuel consumption (%),
• Rating for idle time (hours/day),
• Rating for braking violations (% of total mileage).
• A card with information about the overall position in the rating and a motivator. The overall position in the rating is based on the total score – the higher the score, the higher the position in the rating.